
Related articles
Table of contents
E-ticket and check-in
With Oniva's Check-In feature, you can easily track the attendance of your guests. By using the Check-In function, you gain an overview of the number of attendees and "no shows" on the Event Dashboard, and through the contact status "attended," you can selectively address checked-in guests via campaigns. Here are three different ways to record the check-in of your guests.

E-ticket and check-in
There are three different ways you can check your guests into events with Oniva.
1. Manual check-in in the admin area
You can manually check guests in the admin area. Go to the event contacts and open the guest list of an event. If a guest is present, you can set the check-in via the options menu. This automatically timestamps the check-in and updates the number of checked-in guests on the event dashboard and in the status.

2. Virtual event check-in
With this feature, you can also track attendance at online events. One hour before the event begins, participation is recorded in Oniva. This way, during and after the event, you can check on the Oniva Admin dashboard and in the bookings how many participants attended the online event.

3. Onivas check-In app
With Oniva's Check-In App, guests can be checked in most easily. First, activate the check-in function in the event settings. After activation, you can check in with our app. Check-in can be done either by scanning the tickets or manually via the guest list. The check-in data is automatically uploaded and updated in Oniva as long as the scanning device is connected to the internet. Even if the device is offline, scanning can continue, but the check-in data remains locally on the device and will be automatically synchronised later once an internet connection is available.
Configure check-in
To log into the Check-In App, the check-in function must first be activated in the event settings. After activation, the login QR code in the event dashboard can be scanned with the Oniva Check-In App. The Check-In App can be downloaded from the Google Play Store or the Apple App Store.
Check-in settings
- Display guests' first and last names in the Check-In App: If this checkbox is activated, the names of the guests will be displayed in the check-in app. This allows for quick manual check-in by entering the name. If this checkbox is deactivated, the participant must be searched for by booking number during manual check-in.
E-ticket settings
- E-ticket per total booking: A single E-Ticket is created per booking, summarising all booked options.
- E-ticket per booking option: An E-Ticket is created for each booked option. This allows for multiple E-Tickets per booking to be generated..
If branding elements for the event have been defined in the option representation, these will also be adopted for the E-Ticket. This increases the recognition effect.
Additionally, text and/or an image can be placed on the E-Ticket. For example, a map, sponsor logos, or event information can be placed.

💡 Tip: Once the E-Ticket is activated, it will be sent with the booking confirmation. If not all relevant information, such as directions or ticket information, is available at the time of the invitation, the ticket can also be activated at a later date. The E-Tickets can then be sent to registered guests via event campaigns. Read more in the article: How To: Send e-tickets.
Set up check-in app
Once Check-In has been activated in the event settings, the Check-In app can be set up. To do so, open your event's dashboard and select "Set Up Check-In App" under the event details. Make sure you have the latest version of the app installed on your device for scanning.

Once the app is installed, you can configure your event on your device by scanning the QR code.
Scan e-tickets
To scan tickets, the menu tab "Check-in" must be selected.
💡 Tip: If a guest does not have their ticket on hand, they can also be checked in via the "Guest List" tab. Search for the guest's name or booking number, and check-in by clicking the checkbox next to the name.
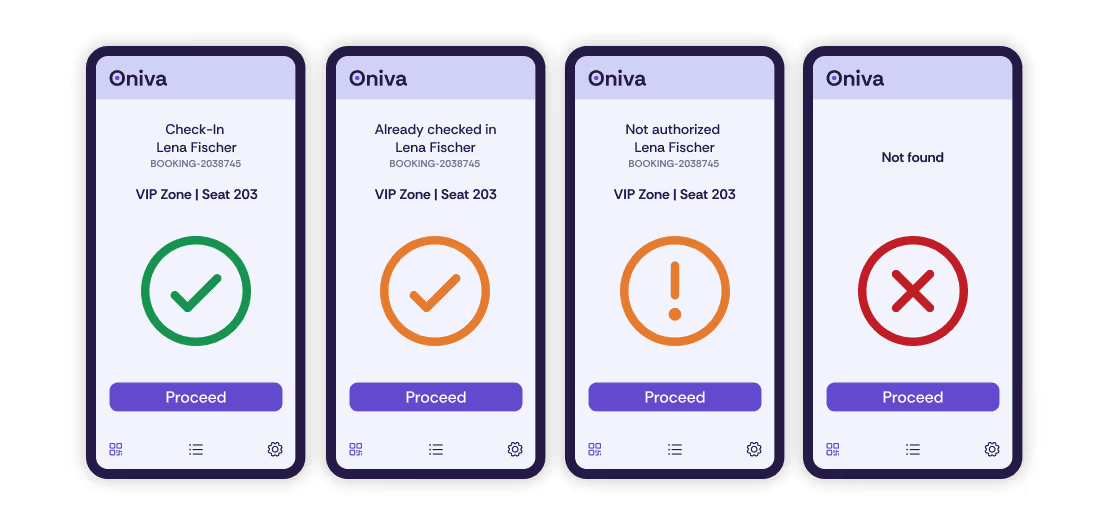
After scanning tickets, one of three messages may be displayed:
- Green checkmark: Ticket is valid, check-in was successful. Next ticket can be scanned.
- Orange checkmark: Ticket is valid, but has already been scanned.
- Orange exclamation mark: Ticket is valid, but the guest is not registered for this option.
- Red cross: Ticket is invalid. Booking not present in Oniva or canceled.
💡 Tip: Both Apple and Android offer features that restrict device usage to a single app. On Apple devices, this feature is called Guided Access, while on Android, it is known as Screen Pinning. This ensures that the Oniva check-in app can be used without being accidentally closed or giving the user access to other apps.
With Guided Access (Apple) and Screen Pinning (Android), the selected app remains active while all other functions and apps are locked. Navigation buttons, gestures, or the status bar can be disabled to prevent the app from being exited unintentionally. This ensures that the Oniva check-in app remains continuously accessible without changes to settings or access to other applications.
Check-In via checklist
If you have only activated the check-in app without e-tickets, you can also check in your guests via the virtual guest list. To do this, you can search for the guest via the search field in the middle menu item “Guest list” and check them in by tapping on them. You can also use this function, for example, if guests do not have their e-ticket to hand. The check-in is treated as if the corresponding ticket had been scanned.

Session check-in
With session check-in, you can now check in individual booking options separately. This ensures that your guests only have access to the areas they registered for. To use session check-in, you need to select the desired booking options either initially or in a second step through the settings in the check-in app.

Late registrations
Late registrations cannot be made directly in the app. Additional guests must be registered in the Oniva admin area by an event admin or they can make a booking themselves if registration is still possible.
Synchronisation & login QR code
Under synchronisation status, the app indicates if check-ins are not synchronised with the app. Click to force synchronisation.
The login QR code allows for configuring another device without the original code needing to be displayed in the Oniva dashboard.
👉 Note: When logging out of the app, all unsynchronised data will be deleted. Therefore, all data should be synchronised before ending the check-in app.


